- Community Home
- >
- Storage
- >
- HPE Nimble Storage
- >
- Application Integration
- >
- Nimble PowerShell Toolkit Certificates & PowerShel...
Categories
Company
Local Language
Forums
Discussions
Forums
- Data Protection and Retention
- Entry Storage Systems
- Legacy
- Midrange and Enterprise Storage
- Storage Networking
- HPE Nimble Storage
Discussions
Forums
Discussions
Discussions
Discussions
Forums
Discussions
Discussion Boards
Discussion Boards
Discussion Boards
Discussion Boards
- BladeSystem Infrastructure and Application Solutions
- Appliance Servers
- Alpha Servers
- BackOffice Products
- Internet Products
- HPE 9000 and HPE e3000 Servers
- Networking
- Netservers
- Secure OS Software for Linux
- Server Management (Insight Manager 7)
- Windows Server 2003
- Operating System - Tru64 Unix
- ProLiant Deployment and Provisioning
- Linux-Based Community / Regional
- Microsoft System Center Integration
Discussion Boards
Discussion Boards
Discussion Boards
Discussion Boards
Discussion Boards
Discussion Boards
Discussion Boards
Discussion Boards
Discussion Boards
Discussion Boards
Discussion Boards
Discussion Boards
Discussion Boards
Discussion Boards
Discussion Boards
Discussion Boards
Discussion Boards
Discussion Boards
Discussion Boards
Discussion Boards
Community
Resources
Forums
Blogs
- Subscribe to RSS Feed
- Mark Topic as New
- Mark Topic as Read
- Float this Topic for Current User
- Bookmark
- Subscribe
- Printer Friendly Page
- Mark as New
- Bookmark
- Subscribe
- Mute
- Subscribe to RSS Feed
- Permalink
- Report Inappropriate Content
02-28-2018 09:15 AM - last edited on 06-29-2021 05:09 AM by Ramya_Heera
02-28-2018 09:15 AM - last edited on 06-29-2021 05:09 AM by Ramya_Heera
Nimble PowerShell Toolkit Certificates & PowerShell 6
If you have used the Nimble PowerShell ToolKit (PSTK) you will likely be very familiar with the extra steps that must be taken when connecting to an array to mitigate a Nimble Self Signed Certificate. The simple command below will fail;
PS:> Connect-NSGroup –Group 192.168.1.50 –Credential admin

To make this command succeed, we need to tell PowerShell to accept untrusted certificates using the following argument;

This is the simplest way to proceed, however, this may open an unacceptable risk in your environment. This is why PowerShell version 6.0.1 (available via GitHub) no longer allows this sort of bypass of certificate validation. Note: when using PowerShell 6.0.1 you must ‘CD’ to the PSTK directory to import it.
PS:> CD C:\Windows\system32\WindowsPowerShell\v1.0\Modules\HPENimblePowerShellToolkit
PS:> Import-Module .\HPENimblePowerShellToolkit.psd1
PS:> Connect-NSGroup –Group 192.168.1.50 –Credential admin

Upon trying the remediation that worked with previous versions of PowerShell, using the ‘-IgnoreServerCertificate’ option no longer works.
PS:> Connect-NSGroup –Group 192.168.1.50 –Credential admin –IgnoreServerCertificate

The solution to both of the following problems is to import the Nimble Array Certificate to the host;
- Less secure communication using PowerShell 5.1 and older
- No communication using PowerShell version 6.0.1 or newer
The first step is to log onto the array via your an SSH tool such as Putty.exe (Available from Putty.org). Once you have authenticated to the array, you can use the following command to get a list of the valid certificates on the machine. Note; you can create new self-signed certifications at any time, but repeat this procedure once you have created these new certificates. Note that there are two dashes prior to the word ‘list’.
NimbleOS $ Cert –list

Once you validate which certificate the API is using (which is what PowerShell Commands will also use), we want to get a text list of the certificate. You can obtain the certificate by using the following command, and copying the output to a notepad.exe on the host, then save the file to the desktop as a text file. Note as before, there are two dashes before the word ‘info’.
NimbleOS $ cert –info group
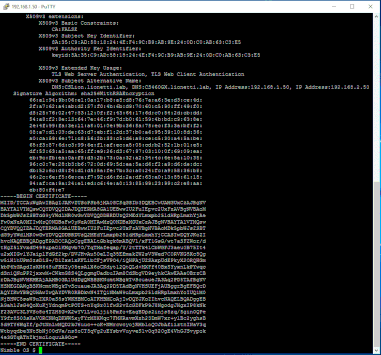
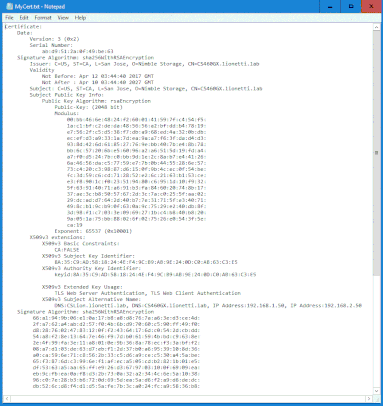
Ensure that your capture continues all the way until (and includes) ‘----END CERTIFICATE----‘
Once you have a file on your desktop containing the text output from the ‘cert –info’ command, you will want to run the MMC control panel on windows. Open a command prompt and type “mmc” and hit enter.
Once the MMC is open, select ‘File’ and then ‘Add/Remove Snap-In’. You will be presented with all of the Microsoft snap-ins, choose Certificates, and select the ‘ADD’ button in the middle of the application.
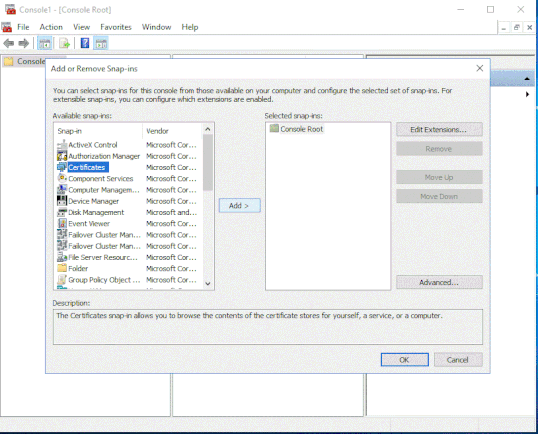
To complete the add operation, you will need to select if you want to add the certificate to the ‘user’, ‘service’, or ‘computer’ account. In this case I have chosen ‘User’.
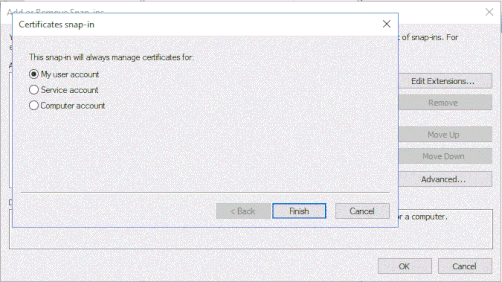
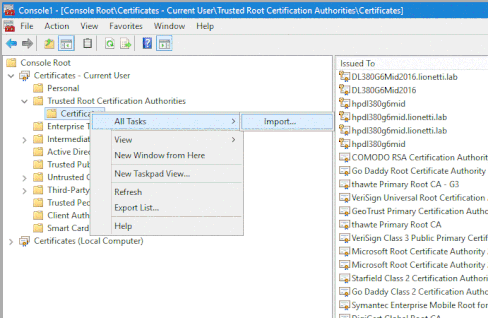
Once you have the MMC screen open, Open the ‘Certificates Current User’ as shown, then ‘Trusted Root Certificate Authorities’ and right click on Certificates to select all tasks, and then select ‘import’
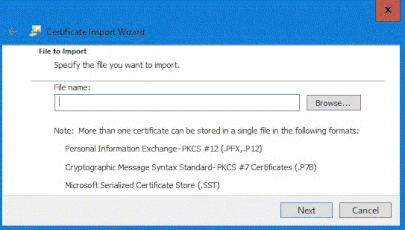
Once the import wizard has started, it will bring up a continue screen to select next, then the following screen where you can select your previously saved certification text file.
Tip: When searching for the filename, ensure that you select ‘*.*’ as the extension to prevent the GUI from filtering your folder results.
Place the certificate in the location shown below. Do not allow the wizard to auto-select where the certificate is placed as the import will fail. Once you select the next button you should see the following warning.
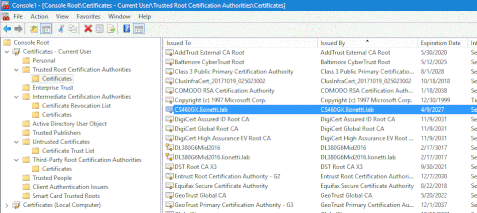
Now that you have imported the certificate, you should see it in the list as shown below.
Once this is complete, you can now connect to the array using the array certificate without any warnings, and without having to ignore untrusted certificates using PowerShell 5.1 (and older) and PowerShell 6.0.1 (and newer);


This is Nimble After All....There has GOT to be an easier way for our customers.
So I took a few hours yesterday to figure out how to both obtain the public key from the array as well as import the Public key to the Windows Store via PowerShell. Rest assured that I have put this in the list of enhancements that the next version of the powershell toolkit has. Until that happens, let me show you the code, and how simple it can be. The following code snippet can be used to accomplish ALL of the above tasks, all you need to do is change the IP address to the address of your array.
$webrequest=[net.webrequest]::Create("https://192.168.1.50:5392")
try { $webrequest.getresponse() } catch {}
$cert=$webrequest.servicepoint.certificate
$bytes=$cert.export([security.cryptography.x509certificates.x509contenttype]::cert)
$tfile=[system.io.path]::getTempFileName()
set-content -value $bytes -encoding byte -path $tfile
import-certificate -filepath $tfile -certStoreLocation 'Cert:\CurrentUser\Root'
import-certificate -filepath $tfile -certStoreLocation 'Cert:\localmachine\Root'
I work at HPE
HPE Support Center offers support for your HPE services and products when and how you need it. Get started with HPE Support Center today.
[Any personal opinions expressed are mine, and not official statements on behalf of Hewlett Packard Enterprise]

- Tags:
- certificate
- Mark as New
- Bookmark
- Subscribe
- Mute
- Subscribe to RSS Feed
- Permalink
- Report Inappropriate Content
02-14-2019 05:19 AM
02-14-2019 05:19 AM
Re: Nimble PowerShell Toolkit Certificates & PowerShell 6
Hi
is it possible to connect to multiple arrays at the same time ?
thanks
